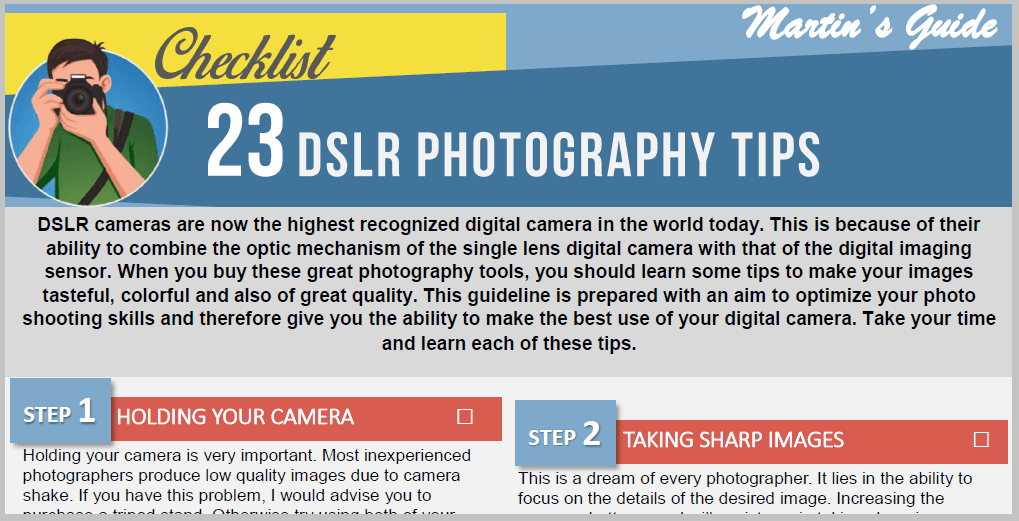
DSLR Photography Tips
 Today I will share with you 23 awesome DSLR photography tips that will perfectionate your photo shooting…
Even better…
You can put these techniques straight to the test…
If you have a DSLR camera, you should be able to capture decent photos…
…but what if you could optimize your photography skills by following 23 well researched and informative photography tips…
You would become unstoppable.
And in this post I’ll walk you through the exact DSLR photography strategies that I use, step-by-step.

What is a DSLR camera?
Angela Nicholson of digitalcameraworld.com states a DSLR camera as the most important tool for professional photographers. She also believes it is the first choice camera for anyone who wants to perfectionate their skills in photography.
Why?
DSLR cameras have an optic viewfinder that will show the view in its lens. It combines the optics and mechanisms of the single-lens reflex camera with an excellent digital imagining sensor.
This reflex design scheme makes it a special camera from the other digital cameras. It is this reflex design that allows light to travel through the lens to a mirror which alternates to make the image on the viewfinder or in the image sensor.
Here are 23 ways to make the images from your dslr camera tasteful, colorful and of great quality.
In these tips you will learn important tips such as:
- Camera settings
- Camera techniques
- Camera features
- Best shooting modes
- Important Camera aperture tips among others.
You are in the best site ever to publish these rare DSLR photography tips that you must know.
As you go through this guide I have no doubt you will be amazed of all the information captured…
This guide is not only well arranged to make it simple to understand but it is also made in a perfect way to suit all my readers.
Whether it is your first time with a DSLR camera or you have been used to the automatic settings, relax and learn some of the DSLR photography tips that will boost your skills.
Why you should read my DSLR photography tips…
DSLR cameras are sometimes tricky to most of us. Most of us are used to the old cameras. The settings from various brands such as Nikon and Canon are also different. That is the reason you cannot ignore this great guide.
What I have indicated in my actionable tips is a simple progressive way of making your camera a perfect tool for your dream photos.
I’m sure you will not only be a sharp photo shooter, but you will also be able to make the best use of your DSLR camera for the highest quality photos.
I believe my tips have what it takes to make your use of the DSLR camera easy and enjoyable. You cannot afford to miss any of these DSLR photography tips.
Let’s get started…
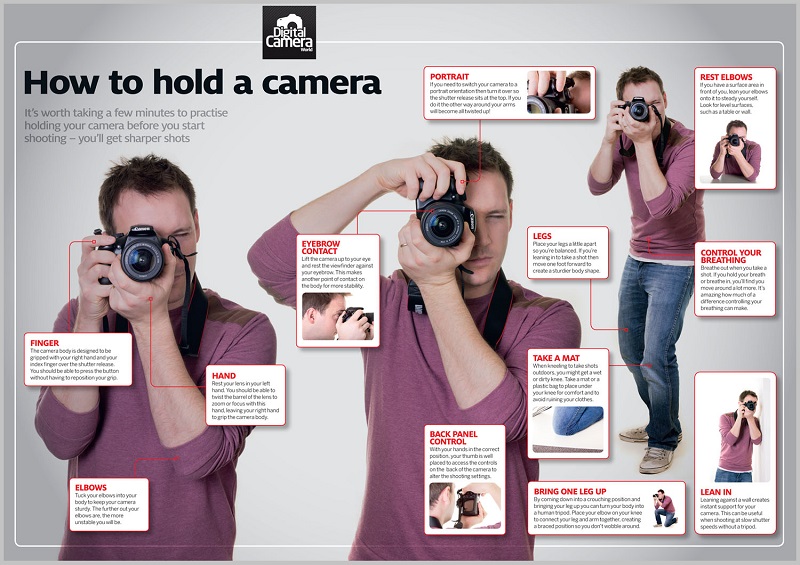
1. Holding your DSLR camera
It would be useless to give tips without teaching you the best way of holding your DSLR camera for perfect images…
That’s why this DSLR photography tutorial should also help you to avoid camera shake. Shaking is highly responsible for most blurred images especially in low light situations where you have to hold down the shutter for long.
The only way to eliminate shaking is by using a tripod stand. Tripods are very stable due to their three legs. After you fix the camera in the tripod stand you can be assured that the likelihood of shaking is very low.
If you do not have a tripod you can practice holding your camera with your two hands and minimizing even the slightest movements.
Here are a couple of awesome practical photos shooting tips on holding your camera:
Avoid strong grip of the camera. Light grips on your camera will make you feel natural while holding the DSLR camera
The right hand should always hold the right side of the camera. The forefingers should sit on top of the shutter ready to depress it while shooting.
The left hand should carry the weight of the camera. Best way of doing this is to make it sit underneath the camera
Line up your shot by bringing your camera close to your body to add stability.
Relax while taking the shot. You can do this by taking a deep breath. Avoid being too conscious during shooting as this might trigger shaking.
Digitalcameraworld explains these steps (and more) perfectly in this infographic.
2. Taking sharp images
We all want to take sharp and perfect images. A good image is clean, crisp and detailed to reveal everything in the captured scene. To be a professional photographer you must understand the DSLR photography tips and tricks required to capture a sharp image.
These are the secrets of all top photographers…
They understand the best way to focus. You cannot have the most important part of the image out of focus and still expect a sharp image.
Be strategic.
Ensure you camera is focused on the details on the desired image.
They change the shutter speed while shooting moving images. If you are moving while taking the images, ensure you have set your camera to fast shutter speed. Otherwise, if the speed of your camera shutter is too low, you might end up having blurred images.
They understand the danger of shaking. Shaking is the greatest threat to having sharp images. Why not buy a tripod stand to minimize shaking while shooting the photos. If you do not have one, try to increase the shutter speed. You can also learn our tactics to avoid camera shake above.
3. Shutter release after taking your images
Look….
Had you planned to take 5 shots in continuous mode but you end up taking 10 shots?
This is common for most people who do not know the best way to release the shutter after shooting the images. Shutter release is a technique that must be learnt by all photography beginners who want to become professional photographers.
Here is what you should know:
- If you depress you shutter for long, you will continuously take photos especially in continuous shooting mode.
- Your camera shutter is easy to depress. There is no need to apply a lot of pressure. Be gentle as it will also give you a chance to easily release the shutter.
- Count the shots you are making in continuous shooting mode. If you are holding the shutter of your camera gently am sure you will be able to time yourself to easily release the shutter after the desired number of shots.
- As said earlier, use your fore finger in pressing the shutter. Do not use its tip. The flat portion of the finger is the best part for depressing the shutter as well as releasing it
- Be conscious while shooting to have control of the number of shots you want to take as well as release the shutter on time.
- Practice makes perfect. You need to do this several times before you are able to press the shutter and release it on the perfect time after taking the required shots.
4. Focusing your DSLR camera
Learning how to focus your camera without letting the DSLR camera to automatically choose a focal point for you is fun. It will also ensure you have great images that you will fall in love with.
This is what you need to do to focus properly;
- Make sure your camera is on the p dial. The p dial should also be switched on.
- Use the viewfinder to look through as if you are taking the photo
- Slowly press the shutter button until you see a red blinking focal point.
- You are now focusing on the object that the focal point is positioned when it produces the red blink
- If you have focused on the right image you can shoot the photo
5. DSLR Camera setting
If it is your first time with DSLR camera, you must learn how to use it… It has more settings that you need to learn than the other cameras. This does not mean that the settings are more complex; after you get used to them you will start enjoying the changes in quality of the photos you are going to produce.
Go through each setting of the camera without altering it. Familiarize yourself with the terms indicated. Do not be afraid to switch your camera from its default setting. I will guide you on exactly what to use in different setups.
“You don’t just take a good photograph; you make it to be good”
– by Ansel Adams
Get the next DSRL photography tips for beginners….
6. Manual mode
Look…
This is the best way to use your DSLR camera. It is indicated by an M Mode. You just need to turn it on before you start using your camera. These are the reasons you should use Manual mode.
- This setting will allow you to control other camera settings such as shutter speed and F value.
- You will be able to control exposure time when using manual mode to make your images more colorful
When you have your camera in your hand do not fear. Think of producing images that will amaze other professional photographers.
7. ISO settings
You will find your DSLR camera with letters ISO. They refer to the film speed. Though the camera is digital, the ISO settings will help you make the image sensor to be more sensitive to the light during photo shooting. The guidelines for setting ISO settings include;
- Using a lower ISO number lowers the speed of your camera.
- A low ISO number should be used whenever possible
- ISO should be varied during the different times of the day. For example an ISO of about 100 or 200 is the best while taking photos in sunny areas.
One of the notable DSLR night photography tips is…
- In the evening a 400 to 800 ISO will be perfect and during night time use the maximum ISO of your camera, probably 1600.
8. Aperture
Am sure you’ve heard this. “A good snapshot keeps a moment from running away” This is exactly what you should do for that quality image.
On a DSLR camera the aperture is labeled by a letter F. You will see this number if you check at the back of the LCD screen. Several F values are indicated on the camera.
This is the tip…
- A high F number will increase the focus area of the camera.
- If you are taking a photo that you need its background use a high F value
- For wildlife photo where you don’t need the image of the surrounding, use a small F number.
9. Understanding Shutter speed on your camera
Shutter speed basically means the time you will require to hold your shutter open to take a perfect photo. There are two types of shutter speeds in most DSLR cameras; the fast and slow shutters. DSLR cameras have a shutter priority that allows you to choose the shutter speed.
Note this…
- The shutter speed will allow light to the camera image sensor
- It should be varied depending on the type of photo you want to shoot
- High shutter speed require use of a tripod to avoid shaking while shooting the photo
- At night you should always use slow shutter speed.
- During the day when you want sharp images during the day use fast shutter speed
10. Exposing shots
To get a detailed image you must learn how to expose your camera. For example in a blue sky, it is possible to capture the image of a bird with details of its feathers. You only need to take the most part of the exposure to the clear blue sky. When you do this, you will avoid shadows that may form hindering the bird details.
11. Focusing your camera to infinity
This is a special feature you will find in your DSLR camera. This feature is only available when you turn your lens to manual focus. Depending on whether your camera is Nikon or canon you should rotate the focus ring to the right or the left.
Here is the best way to ensure you make the best infinity shot
- Switch the camera to manual focus from automatic focus
- Turn the focus ring to the infinity symbol
- Make sure the aperture f is set to the maximum value
- Use tripod stands when using the high F number
- Focus the lens to the distant object you want to shoot until it is in a sharp focus
- Take the shot
12. Partial metering
This is a canon photography tip. Canon camera has this mode that is useful in measuring subject brightness giving you a chance to take the correct exposure. It takes the exposure in about 6.5% of the viewfinder. If you are shooting a dark subject in a bright background it is highly advisable to switch to partial metering mode to produce a detailed image of the subject.
Here is the deal…
- Change your camera to partial metering anytime you are shooting a brighter background than the subject. Partial metering is the solution to back lighting problems.
- After you are through with shooting in the areas with backlighting problems remember to switch back to the cameras default setting.
13. Spot metering
Spot metering is a characteristic mode in the Nikon cameras. In this mode the measured scenery brightness is about 5%. It is the feature that will help you in taking photo in low light areas similar to partial metering. Switch to this mode if you are using the Nikon cameras in low light areas.
Low light instances to use spot metering include:
- When shooting a person’s photo on stage
- When photographing the moon at night
- When taking brightly colored birds at night
Using Histogram in your DSLR camera
Check this DSLR photography tip from a professional photographer
14. Using DSRL Camera histograms
Histograms are some useful photography technique that is often ignored by most people. It helps professional photographers to get a quick presentation of the tonal range in the image they are shooting. The graphical presentation tones the images from black to white on the right. A high graph represents more pixels at that specific point of the image. The histogram will tell you what you have underexposed or overexposed. It is this knowledge that will help you know whether you need to take another shot of the photo.
Here is exactly what you should do:
- Switch your camera to playback mode
- Check the spectrums on the histograms to note the dramatic spikes
- If you see several spikes you should know that the sections are mainly black or white and this may have left some details of the photos
After following the four steps, you should know whether you have overexposed or underexposed your photo. Take control of the white balance settings and shutter release as you take the next shot. This is what will give you a perfect image.
15. Automatic exposure bracketing
Automatic exposure bracketing is a common feature in DSLR cameras. It is a feature that allows you to take three shots quickly, where your camera automatically vary the exposure without you necessarily changing the manual setting between the frames.
This gives you three very similar images in terms of composition but at different exposures.
For example:
When your camera is in continuous shooting mode, hold the shutter down for the three continuous shots. If you are using a single shot mode, you have to depress your shutter three times. Check out the DSLR camera manual for your camera to understand how it works.
Canon photography tips
In canon you will find the automatic exposure bracketing in the menu. Use it to make variations between the shots. It is advisable to use the one stop variation.
Nikon photography tips
Most Nikon DSLR cameras have an accessible button on their back labeled BKT. This is what you will use to vary the Automatic Exposure Bracketing setting. Use this setting in aperture priority mode or in the shutter priority mode.
16. White balance
You have to set the correct white balance in the digital camera as a way of ensuring the white images are correctly displayed.
Why do you need check white balance when taking your shots?
One thing you need to know is images taken at different sources of light will show different colors. This should set an alarm that the image you shot at a cinema hall, the horizon or in areas covered with snow will require you to adjust your camera settings so that you produce perfect color mixture.
If you are taking shots in places with fluorescent lightings, you might find them with a bluish cast due to this light, incandescent bulbs add a yellowish tinge to the lining of the images. All this will be solved by adjusting the white balance.
How do I adjust the white balance setting?
Some DSLR cameras have automated or semi automated ways of adjusting the white balance. Understand each component of the setting is the best way of adjusting your camera white balance.
This is what I mean;
I can explain by using the example of the auto and the shade setting. This is the way to use them.
The auto setting allows your DSLR camera to guess the lighting and make the best shot as per its decision. If you are in a tricky place that you do not understand the type of lighting this is the best setting. The shade setting recognizes the difference in lighting when in direct sunlight and when in a shade. When you set your camera in this mode, it will warm the images in the shade and this will help you have a perfect shot.
17. Shooting your camera in flash
If you are not a professional photographer, you won’t be able to produce quality images while you are using your camera flash. This is the reason you have found most photographers criticizing the use of flash while taking photos. Some of the manufacturers have released cameras that now push the ISO higher rather than use the flash. If you use your camera flash appropriately, you will avoid blowing your photos with a lot of light.
Here is the tip
Do not use your flash only when it is dark. Even outdoors when the light is still there, a flash will increase the image quality of your photos.
When you want to pick good photos with your DSLR camera here is the best way to use your flash;
Ensure you are close to the subjects to make the flashlight have some impact on the subjects. If it is not possible to get close to them, it is better to use the ISO setting. It will produce a better image than the flash.
Use slow sync flash. This will ensure you do not interfere with the ambient light in the photography scene. A slow sync flash is only applied when the shutter speed is low while shooting with an open shutter.
Diffuse your flash may be by use of a white card when you are using the fixed flash unit. Also, make sure to increase the exposure compensation to avoid interfering with the image lighting.
18. Dirty DSLR image sensor
If your camera has a dirty image sensor, you will get photos that have dark spots. You will note that every photo has the spots in the same position. There is a high likelihood of dirtying your cameras image sensor even without your knowledge. Some Canon DSLR cameras have been designed to avoid this problem.
This is what camera manufacturers fails to guide you:
- Anytime you are changing your camera lenses you should always turn it off to avoid attracting dust to the lens.
- When changing lenses, your camera should be upside down.
- You should always have the new lens ready before opening your camera to change the old lens. Avoid overexposing your camera to dust.
- Your image sensor is sensitive; clean it with care
- Changing your camera lenses in dusty places is dangerous. You will definitely pick some specks of dust.
19. Cleaning your DSLR lens
Am sure you would love to see your DSLR camera last longer to serve you. If you want to use it for long, you must ensure it is well maintained. A large component of the maintenance is cleaning the camera. For the lens, they should be regularly cleaned especially when they are dirty. But some of us do not know the best way to clean their camera lenses.
Here is the way to clean your DSLR camera
Purchase a UV or skylight filter that you will keep your lenses away from UV light, scratches and also breakages.
Alcohol lens cleaning fluids should be used every time you are cleaning your DSLR cameras. To the photographers who use their breath and a cloth, it is advisable also to wipe the lens with the cleaning fluids.
The lens tissue should be used to wipe the lens; this will help you avoid scratching them. If you do not have a lens cloth, use microfiber cleaning cloth.
Here are more cleaning tips……
When you are using your blower to clean inside your camera, ensure you squeeze it out as a way of removing any dust from the blower. Be careful while using the blower, you might damage the camera while cleaning it.
If your camera has a lot of clouds of dust on the outside, use a brush with soft hair while cleaning it. A lens cleaning pencil is one the best brushes to use on your camera.
Throw some silica gel sachets in your camera bag to draw away moisture that might harm your DSLR camera lenses.
20. Controlling your background
It is a dream of each photographer to have a great background for his photos. The background tells us a lot about the quality of the images taken. It is highly advisable to check your background before you take the photo. If you find that the background is not appealing, move your subject to the place you love.
Another way to ensure you pick a good background is to change your shooting angle. To the experienced photographers, they know the best way to vary the shooting angle to avoid distractions and also to capture the best background.
Here are some of the best ways to perfect your background;
Use the aperture setting to blur the unwanted background. It is a simple way to throw your background out of focus. A wide aperture will allow you to blur your background.
The focal length can also be used to blur the unwanted background. A long focal length will ensure the subject in your photo takes more space than the background.
21. Filling your frame
Did you know this?
When taking your photos, the subject is the most important thing to capture. Filling your photo with the point of interest is, therefore, a perfect way of beautifying it. It is also another way to control your background.
You can achieve this by zooming your subject or getting close to them. Use the optical zoom to capture as many details of your subject as possible. You can also position yourself in the best way that will help you take a close shot. After your fieldwork, you can eliminate the unwanted parts of the photos by cropping the images leaving them filled with the most important part.
22. Focusing landscapes on your DSLR camera
Look:….
You might have been thinking the best way to focus on the landscapes and pick a good shot. Focusing on the landscapes will produce wide angle images. It is basically picking one-third of the scene.
You need to set your DSLR camera to a large aperture number to focus a third of the scene. When shooting, you need to focus to a single focal point. View the image through the rear vision to set the single focal point. This is important to avoid blurring the front part of the image. This technique can also be used to capture the horizons.
23. DSLR Accessories
It would not be wise if I ignore this important DSLR camera tip…
A camera without the needed accessories may not work properly, and this may inconvenience you while in the field taking photos.
This is a simple cross checklist for the important accessories you need to have:
- Do you have these accessories with you?
- A good camera bag to protect your camera during your field work
- An extra battery to ensure you don’t run out of charge while shooting your best photos
- An LCD protector
- A padded neck strap to make the carrying of your DSLR camera comfortable
- Lens cleaning kit, a blower, UV protector filter and a polarizing filter for DSLR camera cleaning
- A tripod and a remote shutter release to facilitate your photo shooting
Here’s What You Can Do Next…
If you enjoyed this guide, I want you do one thing:
Leave a comment below to let me know.
Whether you make landscape photos or pictures of buildings, people or animals…these 23 Photography Techniques work.
And I REALLY want to see you succeed to become a better photographer.
And step #1 is to Download this Free PDF Checklist below
And leave a comment below right now.
Leave a Reply